| User Guide Sending a Support Request |
Contents
I - Overview
BeAnywhere Support Express is an advanced Software-as-a-Service solution that allows comprehensive remote access to Microsoft® Windows® and Apple® Mac® computers in order to provide IT Support, as well as system management and monitoring.
In order to connect yourself to a technician, using BeAnywhere, you’ll need to run a small program. This quick guide will show you how to download and run this program – the “Support Applet”.
Through our solution, a technician will be able to:
- Chat with you , using voice or text, to rapidly access and solve your problem.
- Obtain information about your hardware and software configurations, for problem assessment.
- Remotely control control your computer, as if he was sitting right next to you. The technician will be able to change settings; create, delete and check all sorts of files; download and install programs; etc.
- Copy files and folders from and to your computer.
- Restart your computer, even in safe mode.
- Record a video of the session * and provide you with a um detailed report about all support actions performed while connected to your computer.
- Send you a survey , where you’ll be able to classify your level of satisfaction.
* Depending on the plan subscribed by the technician
II - Downloading the Support Applet
Windows Version
To download the BeAnywhere Support Express Applet you can follow two different methods:
a) Insert a code (the technician will provide you the code and the lead to the site where you should use it);
b) follow a direct link, also provided by the technician.
a) Inserting a PIN Code or a Calling Card Code:
The PIN code is composed by 6 algorisms (e.g. "123456"). While active (for as long as the technician decides), this code can be reused an unlimited number of times. The Calling Card code is composed by a prefix of 4-8 characters (e.g. "CCARD" or "HELP365") and its validity is also defined by the support provider. The applet downloaded using a Calling Card code can be setup with an expiry date, as well as a limited support time available; after meeting one of those “deadlines” it cannot be used again.
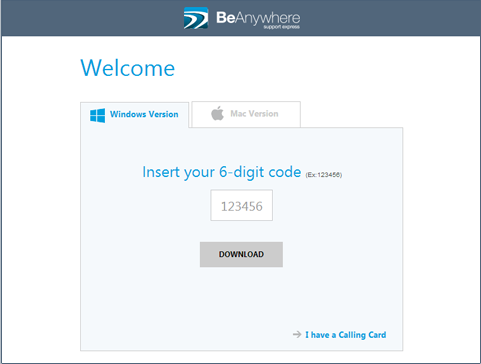
1 - Follow the URL your support provider has given you and insert the 6-Digit code or the Calling Card code (that he also provided you with). By default, the text entry-box available will be for the PIN code. If you have been given a Calling Card Code, click over the link at the right bottom corner of the window.
2 - If the code has been inserted, press the “Download” button; if you’re using a Calling Card code, use the available textbox to enter your code and then press the “Download” button.
3 - The Applet’s download will begin. Once the download is complete, you’ll just need to run the program; you don’t need to save it or install it in your computer.
b) Using a direct link:
A direct link will remain active for 12 hours and, during that time, can be reused an unlimited number of times. For usual customers, technicians can also provide direct links for Calling Cards – these calling cards can be originally set with a defined expiry date, as well as limited support time available.
1 - Copy the link the technician has given you and paste it in your Web browser. The download of the support applet will start immediately.
2 - Run it when done; you don’t need to save it or install it in your computer.
Mac Version
1 - Follow the URL your support provider has given you. By default, the text entry-box available will be for the Windows Version PIN code.
2 - Click over the “Mac Version” tab.
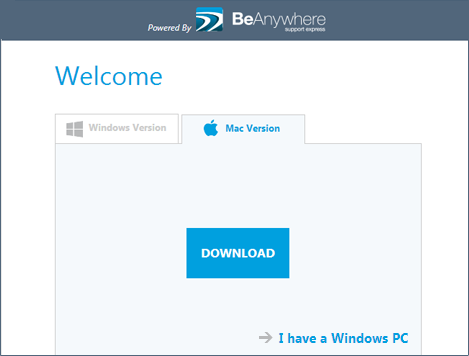
3 - Click over the “Download” button.
4 - Install the program and click over its icon.
5 - Enter the PIN code the technician has given you.
III - Running the Support Applet
1 – If you’re using a Windows OS, you can run the downloaded file directly from your browser; if you have saved the file in your computer, look for the folder where it has been saved and double click over the file.
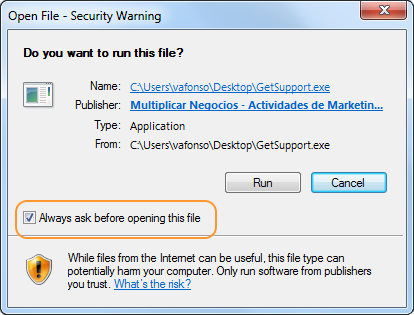
2 - If a security box just like the one on the upper image pops-up, click “Run”. You can also uncheck the box “Always ask before opening this file”.

3 - A new window will appear. If you want to give the remote technician full administration privileges to your computer (a lot of the remote support tasks will require this), click on “Run as Administrator” (you will need a username and password with administration rights on your computer).If you are unsure or do not want to do that at the moment, just ignore this. The technician will later have the possibility to request administration rights.
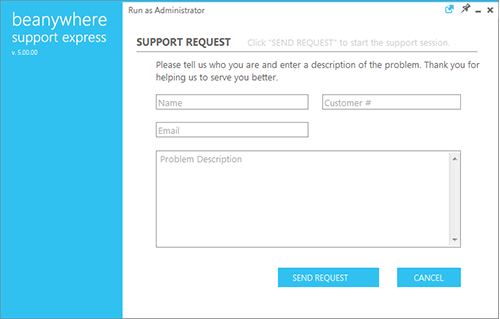
4 - Depending on the configuration made by the support provider, a form asking for more information may be presented to you (or not). This information is not mandatory and the form will close itself after a predefined time-limit, if no data is inserted. However, it is recommendable to add the most details possible, in order to help the efficient handling of your support request.
5 - As soon as you hit the “Request” button, the technician will receive your request.
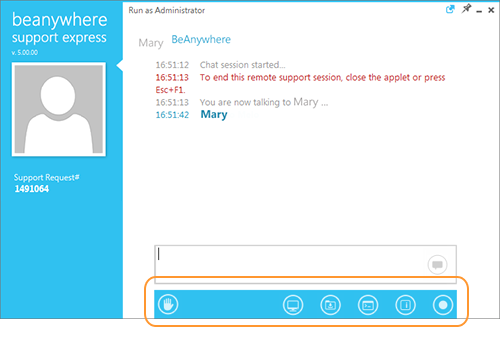
6 - When the request is accepted by the remote party and the connection is established, a chat window will appear, allowing the text communication with the technician. The chat window will also present the technician’s name, his photo (if available) and the support request number (left side of the window).Please do not close this window or the remote session will be terminated. You can, however, minimize it.
7 - When visible, the icons placed at the bottom of the Applet will allow you to deactivate some features (e.g. Remote Desktop, File Transfer, Video recording). The shortcut “Esc+F1” will immediately deactivate all features. This veto possibility over those features is predetermined by the technician.
8 - You can end the session anytime by closing the applet (clicking on the right upper “X” symbol).
9 - When the session ends, you can close the applet and delete it.